Dual Extrusion 3D Design with the @MorphiApp & @AirWolf3D HDR

Dual Extrusion 3D Design with the @MorphiApp & @AirWolf3D HDR

In our three gr. 8 classrooms, students have learned the process of 3D printing using dual extrusion (printing with 2 colours) using a Makerbot Replicator 2X. Last year, due to the large number of students we had using the printer, we needed another to keep up, but this time we chose an AirWolf 3D HDR printer for a few reasons: cloud based slicing via Astroprint, larger print size, and the ability to print with a wider range of materials. Added bonus – the tech support help from AirWolf3D is excellent.

While I’ve posted some examples of how our students design and print using dual extrusion with the Makerbot, my teaching partner, Marc Westra, and I quickly learned the process was quite different using an AW3D HDR – like taking the elevator instead of the stairs.

Here’s what I learned over the Christmas break, and what we’ll be teaching our students…

Step 1: When printing in dual colors on the AirWolf 3D HDR, you need to design the part in CAD software that you would like printed in nozzle 1, and save it as an .stl file. Then design the part you would like printed from nozzle 2, and save it as a separate .stl file. Both .stl files must be designed around the same origin point for this to work, so I found it easiest to design all parts together, manipulate/size, then make copies of the original parts stored as a separate file. This is demonstrated step-by-step below.

Aside note: With the Makerbot software, you initially design each part regardless of point of origin, then import each file into the slicing software, Makerware. This is where you can manipulate size, position, and assign .stl files to the extruders around a point of origin.

Back to the AirWolf..

Step 2: Open Cura (slicing software – good intro video here) and bring in the .stl file you want printed from nozzle 1. The first .stl file that is brought into Cura will automatically be designated as printing from nozzle 1. Then bring in the second .stl file, which you would like printed from nozzle 2. Once this is done, right click one of the parts and select “Dual Extrusion Merge”. This will merge the parts together. You can then adjust your settings in Cura, save as a .gcode file, and print the .gcode file.

Step 3: Print

Astroprint does not have a capability of processing dual color prints, so the cloud slicing feature cannot be used for this purpose. Basically for now, you can send your .gcode file to the AW3D HDR via the upload button in the Wolfbox Interface (step-by-step instructions here). The .gcode files will not be stored in your AstroPrint account but they will be stored on the Wolfbox.

You could also connect your printer to a laptop via USB cable and print using RepetierHost. 

The benefit of printing via the Wolfbox/Tablet vs. RepetierHost is there’s no need for a laptop, USB cable, and students can send their files to the tablet so prints are queued.

What? Can Gr. 8 students do this? Absolutely.

Below is a simple example of how to print via dual extrusion using the AirWolf 3D HDR. The CAD software used in this example is the Morphi app which we’re switching to since our students now all have ipads. The principles/steps however, apply to any CAD software.

Here’s what I did…

Part A using Morphi app: I first added the green sphere then the red cone. I did not group, or merge. This file was saved in the gallery (as an .stl file).
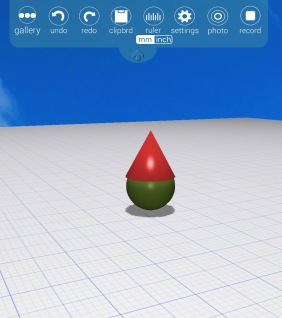
sphere and cone

I clicked on one item (e.g. red cone only), selected  “clipbrd”, “copy selected”, “gallery”, opened a new build plate (by clicking on the “+” sign in the gallery), selected “clipbrd”, “paste selected”. The red cone appeared alone. This file was then saved in gallery as a new .stl file. Repeat these steps by selecting the green sphere only.

Therefore I have an .stl file with just the sphere and an .stl file with just the cone, but both pieces are in the same position on the grid as per the original design. Students will email each file and use a laptop to download each .stl file.

Part B: Open Cura, and bring in each file separately.  I brought the sphere in first, then the cone. Each object  sat beside each other (see pic below – I didn’t arrange them like this).
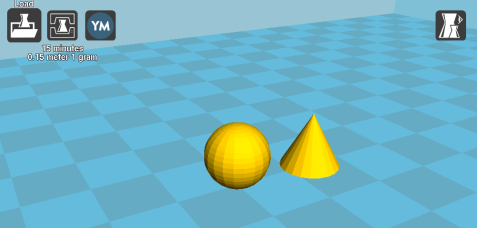
Screen Shot 2016-01-02 at 3.51.08 PM

Right click, choose “dual extrusion merge”.
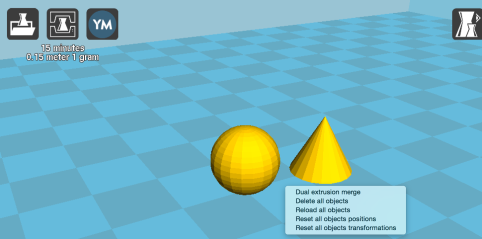
Screen Shot 2016-01-02 at 3.51.24 PM

The sphere and cone automatically moved to the same placement as in the original design. Magical.
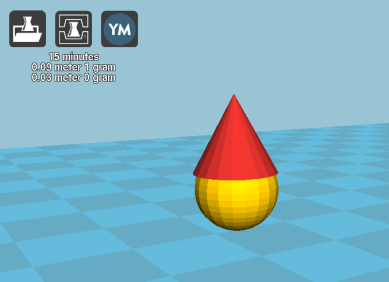
Screen Shot 2016-01-02 at 3.51.54 PM

Save as .gcode and print.

Note – whatever .stl file you bring in first will be assigned and printed by the left extruder, the 2nd will be printed by the right extruder. If using more than 2 parts (example below), select all the parts that are to be the same colour.

Example 2 – more complex

In the example below, I added a yellow cylinder. I want the red cone and yellow cylinder to be printed using the same coloured filament.
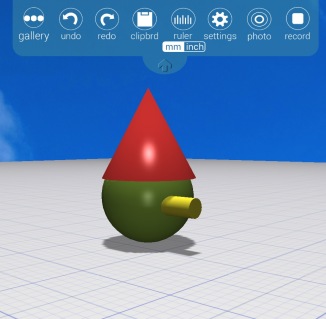
FullSizeRender 3

Similar to the first example, I clicked on one item (e.g. red cone only), then the yellow cylinder, selected  “clipbrd”, “copy selected”.
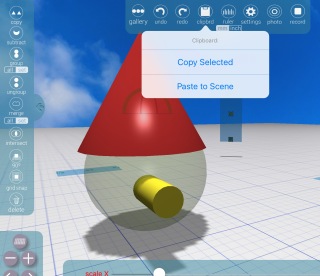
FullSizeRender

Same as in Example 1, I selected “gallery”, opened a new build plate, selected “clipbrd”, “paste selected”. The red cone and yellow cylinder appeared. This file was then saved in gallery as a new .stl file.
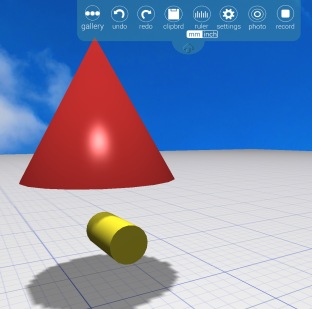
FullSizeRender 2

Repeat these steps by selecting the green sphere only, then follow the same steps in Cura (Part B).


Yes, dual extrusion requires a few more steps, but Gr. 8 students are pretty smart cookies and love this stuff!

Students as Teachers: Week 2 in the Makerbot 3D Classroom

The Makerbot 2X Replicator 3D printer has brought some exciting, vigorous learning into my grade 8 classroom. My room is full at lunchtime and after school with kids experimenting and curious teachers and students observing. On a couple of occasions, I’ve even had to kick a few students out after 5 p.m. I had no prior experience with these printers. While fascinated with the articles I’d read showing how they are used in meaningful ways, I had never seen one up close until ours arrived in my classroom. In a previous post, I wrote about how students dove in, setting it up. We’ve had the printer now for eight days. In this post I’ll share what the students and I have learned together. When the tech department teachers paid a visit to our room, these 13 and 14 yr. old. “geniuses” explained how the machine worked, its maintenance requirements, cost and time of production for each model, their newly acquired vocabulary and their next steps.

Makerbot has an excellent site complete with instructional videos and an expanding page offering uses in education. Last week, when we were struggling with the Makerware download, I submitted a support ticket. The Makerbot support team was responsive and within a few days, and the software fixed, we had the program loaded onto all laptops and netbooks.

In order for students to understand what a 3D printer could produce, we spent a class period touring thingiverse. This is a design community where students can discover what others have created, and because designs are licensed under  Creative Commons, anyone can use these. The students learned how to download and print a few items from thingiverse – guitar picks, hockey stick and puck. Students are very respectful and conscious of the cost associated with printing, and so they weighed and determined the cost of each item based on a filament cost of $58/kg. The time to print each item is determined not only by the size but by the resolution, so they decided to compare the quality and time of a detailed castle in high, medium and low resolution.

Medium Resolution

High Resolution

Comparing resolutions (Left t0 Right): Low, Medium, High

My next door teaching partner, Marc Westra, and I wanted students to understand that 3-D printers aren’t a fad, just used to manufacture toys. They offer benefits to society that most of us haven’t even imaged. As part of a reading activity, students explored Facebook, Twitter, Instagram and sites such as 3DPrinterworld.com to discover a multitude of uses.

This week as more students chose to spend their lunch hour in my classroom, I suggested the kids play with two design software programs, Sketchup and Auto123D (I had no experience with either). They picked up Sketchup very quickly. One student designed an army tank, then the group worked together to determine how to export the file into Makerware and print (export, save as .OBJ file). Once in Makerware, the students decided they needed to add supports for the overhanging parts of the tank which are removed after printing. All of this was happening while I was learning how to use Auto123D from Riley, another gr. 8 student.

During the next class that followed lunch, while I was teaching Language, the printer softly sang out its robotic song of beeps and bells as it churned out “Joey the Tank”.

From design to creation

Yes, there were some mistakes (yeah!) which they’ll solve and reprint. Still, the students were pretty proud of themselves after creating and printing the first original 3D model at Madill.  Skills used: collaboration, critical thinking, creativity, communication and problem solving.

Rear view showing supports

Joey the Tank

In the following class, I had these students introduce Sketchup to 60 of their peers. They’ve written an extension by creating a model for the students to produce in the next lesson. For me,  the most important piece of this experience is recognizing who these “teachers” are. A few are those “C” students who fly under the radar in the regular classroom. Now, they have moved from learner to teacher.

Student teaching students

Some students prefer Auto123D as the design software. Using the app 123D Catch, they discovered how to turn photos into a 3D models of themselves. Their goal is to create their entire class in 3D.  Other designers/entrepreneurs in class want to design and sell (as a Gr. 8 fundraiser) FE Madill “stuff” – iphone cases with the student’s name embossed, guitar picks, and more.  Their list is growing and will lead to another branch of learning including marketing and economics.

Success comes in many forms and pathways. Providing opportunities for students to explore areas of their interests strengthens our connections with them.  While there may be no direct mention of computer design structure in the Gr. 8 curriculum, the critical thinking skills they are developing as they collaborate and share is enriching their self-directed learning. It’s fascinating to experience. I’m looking forward to seeing how students and other teachers in our school use this 3D technology.

Using Diigo in the Middle School Classroom

One of my goals this year was to teach my students to use Diigo.  With a focus on inquiry-based learning, my students do a lot of digital reading, and collaborate within and outside of the classroom.  Diigo is an excellent tool that enables students to bookmark, tag, highlight and annotate their online text, which can be accessed anywhere, anytime.  This annotated text can be privately or publically shared with other students or groups, depending on their settings.  In addition, Diigo allows my students to make more efficient use of their time by accessing similar sites from other Diigo users with shared interests.

While Diigo offers education accounts, I chose to have my students set up their own accounts.  As these students move on to high school next year, it’s important they carry their virtual filing cabinet with them.

I began the class by showing an introductory video, followed by a tour of my own Diigo library and network.  Next, my students set up their own accounts using their school appointed email address, username and password.  Within minutes, they had figured out how to follow me (“I’m creepin’ you Mrs. D!”).  Imgine that, students wanting to see what the teacher is planning!

Once my students had added each other as followers, I directed them to my “responsibility” tag in my Diigo library.  Using various web 2.0 tools, each student will be creating a biography on an activist of their choice who demonstrates this trait.  Rather than post the introductory link on the class wiki, Diigo saves time as I can bookmark the site once, and direct my students where to find it.  Once they had saved the specified site into their library, they spent some time surfing through the site, highlighting text and writing sticky notes.  It’s important to let students “play” and discover when learning a new tool.

The students love it.  “No more mess of papers that I can’t find.  Everything for my project is here”.  They were excited, and were planning out their next steps.  “Summarize the text on the sticky note, copy my “jot” notes into a Google Doc to edit, and post the final project on my blog.”

My next step is to have students create their own groups as we move into shared readings and collaborative projects.  Within these groups, they can set up a topic and have discussions, similar to a running a chat room.  Bill Ferriter, a 6th grade teacher, shares a wealth of social bookmarking uses in his wiki, Digitally Speaking.

My students recognize Diigo as a tool they can use to collaborate and share, improving their productivity and learning.  They’ve taken another step as they develop their digital footprint.

Peer Editing in the Clouds with Google Docs

EduCon 2.2 is a conference where education innovators meet to discuss the use of technology as a learning aid in schools.  The tweets posted by those in attendance, and the EduCon 2.2 philosophy,  mirrored the steps I was taking my students through as they  worked  towards posting their first major piece of writing on their wiki’s.   These principles are as follows:

  • Technology must serve pedagogy, not the other way around.
  • Technology must enable students to research, create, communicate and collaborate.
  • Learning can — and must — be networked.

Writing is hard work.  For some students, that is a concept they fight tooth and nail.  Their preferred process often looks something like this:  rushed thoughts scribbled onto a template, convert to full sentences, hand it in, done.   That’s why principle #1 is important.  Technology can support the pre-writing process of brainstorming, modeling, and graphic organizers that bring out higher level thinking and student achievement in writing.

In my classroom, once students have their graphic organizer completed, the “clouds” move in.  Google Apps is an example of “cloud computing”, a techie term used to describe distant servers that store data.  It’s a free online program, similar to Microsoft Office, which students can safely access from school and home.  The apps include word processing, spreadsheet, presentations (Power Point) and form (useful to make quizzes).   At the beginning of the year, each new student is set up with their own account, supplied by DDoc from the board’s Tech Team.  Their account is designed with a username based on the school and a number instead of their real name (e.g. turnstudent01).   Students who were in my gr. 7/8 class the previous year maintained their original account.  Using the word processing app (Google Docs), students type their first draft.   They get a kick out of the fact that they are writing “online”.  I know they are safe and no one other than me and their parents, can access their work.

Principle #2 focuses on communicating and collaboration.  In this example, that means peer editing.  Once the initial draft is complete, students “share” their doc with two other students for peer editing.  Using different coloured font, the peer editors type suggestions based on the rubric, a recent grammar lesson, or basically whatever needs to be added to help the” owner” of the document.   Peer editors can write at the same time as the owner to speed up the process.  Struggling writers who are linked with a stronger writer, get the chance to read some good examples before revising and editing their own.

Effective peer editing takes time and comes with its own set of challenges.  Over the past two years, I’ve learned that peer editors using Google Docs need constant training.  We practice, practice, practice on how to constructively comment.  Surprisingly to some, inappropriate comments are not an issue, lack of constructive criticism is (perhaps not wanting to hurt someone’s feelings?).  So we practice some more, emphasizing the fact that you’re helping your peer when you give specific feedback so the owner can edit before I see it. “Great job” doesn’t cut it.  I’ve also learned this lesson needs constant reviewing.

Sometimes students don’t buy in. They couldn’t care less about another student’s writing.  They are not yet sold on the importance of developing  “communication and collaboration” skills.   As a result, I sometimes assess students on their own peer-editing skills. That usually convinces them buy in.

The peer-editing groups are changed each term. I align them based on strengths and struggles, ensuring strong and struggling students each receive some constructive peer feedback.  Sometimes students, no matter how clear you make it, will not follow a rubric. Having a peer comment on their work seems to help.  “You got to add..……to get a better mark.  You know Mrs. D will tell you the same thing”.

The beauty of networking with other students using Google Docs supports principle #3. After the owner has had two other students read and evaluate their work, they have time to make improvements before being graded.  Google Apps is accessible anywhere there’s internet, so students can, and do, work on their assignments from home.   Since I can view each student’s history, I see they are excited and engaged based on the times of day (and night!) they are working.

We are a small school in a rural area.  Not all students in my class have access to technology at home.  It’s important they are given numerous opportunities to become digitally literate.  Recently, when I ran into several of my grade 8 grads at their high school, they told me they continue to value and use Google Apps on their own.

Peer editing with Google Apps helps support my students with the writing process by creating a community where students support each other.   “Computing in the clouds” supports the writing process outside of school, since it’s accessible anywhere there’s an internet link.

When I first started using Google Apps with last year’s class, I wasn’t sure how things would go.  But we all learned together, modeling the three principles supported by Educon.  Students love the process and the benefits are clear.  After all, who wouldn’t want to spend their days writing in the clouds?

How to Introduce Twenty-Four Grade 7/8 Students to Their Own Wiki Site


Step 1:  Have faith in them.

Step 2:  Set up a page on your class wiki where they can click on their personal wiki link. This helps those students in particular, who chose a long, crazy name for their site. For example, http://ts37’sstupendouslywickedwiki….   Note to self: next year, no long, crazy names!

Step 3:  Give them time to explore, share, talk, move around, be amazed.  Take this time to fix password glitches and log-in issues.  Be sure to take a second to look around.  It’s like you hit a magic switch – they start writing, on their own, without a prompt!

Step 4:  Bring everyone back together to ask and answer questions, which helps to set the rules.  Ask them, “Why do you think we’re doing this?”  Metacognition skills surface.  They know.  “To show each other our work.”  “To learn about internet safety.”  “To show our parents what we’re doing.”  They realize the maturity level that’s expected of them, without a word from you.  They stop asking if they can add gaming links and wild videos. 

Step 5:  Show them the “how-to” page on the sidebar of your class wiki.  Tell them they can click here for instructions on adding pages and links to their own site.  Know however, that realistically, they’ll never use it; it’s more for you.  Kids click, click, and click again, until they figure it out on their own.  They will. 

Step 6:  Show them a great video with a message, such as Lost Generation.  Model how to embed it into a page.  They decide the video you showed is really cool and they proceed to embed that video with the powerful message into their own site.  It was their idea.    

Step 7:  Give them more time to play.  They forget they’re missing floor hockey in Phys. Ed.  They continue to write, on their own, WITHOUT SPELLING MISTAKES.  I am floored.  This writing has not even been peer-edited.  When I show my astonishment, they say, “Hey Mrs. D., someone’s going to see this!”  Make sure you close your mouth because believe me, your jaw will drop. 

Step 8:  Forget to eat lunch.  You are too busy complying with their requests to read their newly created pages.  Tell them to remind you on Monday of their great ideas, because there’s too many to remember right now.  Stop wondering if you’ll come up with enough creative projects for them to post on their site.  Tell the struggling grade 7 writer, with the “Caramel Sundaes” page, to show her idea to the class on Monday. 
“What’s the title mean?” I asked. 
“It’s going to be a weekly summary of all the good things that happened to me each week.” 
“Neat, but why the title?” I ask. 
“Because all good things seem to happen on Sundays, ” was the reply.  Cool. 

Step 8, Part B:  Prepare to meet a personal side of your students you’ve never seen before.

End of Day 1.            Repeat Step 1:  Have faith in your students. 

Thanks DDoc!

Podcasting and Pajamas in the Classroom: Best Day of my Teaching Career

     The title bears repeating.  Today was the best day of my teaching career.  Not only was it pajama day, and a Friday, but it was a day where all my students were engaged for the entire day at a level I’d not seen, producing work that showed the critical thinking I knew they were capable of.  They were happy and excited.  I don’t ever want to forget the feeling of today. 

     What made it so great?  Planning, technology, an awesome colleague and students’ respect for each other.  It had been a tough slog back to school.  Two weeks off over Christmas for some of my students was too long, and getting them to focus at the level they’d left in December was frustrating me.  I pulled out the good stuff – a read aloud about a cranky old (according to the main character, “over 40”) teacher who, to their delight,  died.  “Write a description about one of the characters you met today.  You’re making it into a podcast on Friday.”  The lure of a new twist was the ticket I needed.   Peer-editing and oral practicing were completed without complaint. 

     I had tried podcasting last year, and it was a struggle.  Students were stationed at computers in our school computer lab, which is divided into two rooms.  This resulted in a teacher (me) running in and out of the rooms in order to help students.  The two-room setup also limited the amount of sharing of ideas between students.  This year however, our school is fortunate to have a class set of mini-computers, plus a Smartboard in my room.  Heaven!  However, the mini’s also came with their set of challenges.  The night before the lesson, our French teacher, Mlle. R., sat with me as I made sure Audacity worked on one of the mini’s.  No go.  They still needed lame encoder downloaded on all twenty-four.  Mlle. R. is a star!  This morning, with tag-team military precision, she helped me download and test the required program onto each mini.  Students entered class, logged onto their mini’s, and we were away.  Smooth sailing.  As I demonstrated the process on the Smartboard, (in my pj’s) students followed along.  They were able to learn from each other as students called out suggested shortcuts they discovered along the way.  In addition, Mlle. R. had agreed to come into my room and help the students, instead of teaching them in her French class.  It made sense, since she would be moving my students onto French podcasts.  Having two teachers in on the training session, even for a short period of time, helped immensely.  The resulting first effort showed a side of some students I’d struggled to reach all year.  So while these productions were small, students were off to a good start.  They connected, predicted, summarized and articulated their thoughts in a way that pen and paper had not produced.  Cloud nine!  Listen to students’ podcasts.  Their resulting comments on our wiki Wallwisher illustrate their engagement.

     The afternoon brought similar success.  The project:  produce a Bitstripsforschools cartoon demonstrating the Particle Theory of Matter.  Students had their previously created planning templates ready.  Heady stuff for any day, but a Friday afternoon?  What was I thinking?  But picture twenty-four students, one hour before the weekend, hunched over, glued to their computers as they enthusiastically created a comic demonstrating a scientific theory.  I stood back, admiring how they shared with each other, as they linked science and art.

     I’m excited for the projects we’ll be moving into.  Voicethread is the next introductory training program I’m planning.  And yes, Mlle. R. and I will work together for part of that session so students learn the ropes. 

     Yes, today was the best day of my teaching career.